In my last post I showed how to install bitwarden_rs, an unofficial fork of bitwarden server, on a Synology Diskstation using docker. Now that everything works, I’ll show you how to activate live sync functionality on Synology. It’s not really easy, but doable. We need to add location based reverse proxy in Synology Nginx.
Basically we need to do 3 things:
- enabling WebSockets in Docker
- add new location in the reverse proxy
Problem is, that we can’t do this in DSM GUI - open the WebSockets port in your router
UPDATE: change path to certificate and nginx command for DSM 7.0
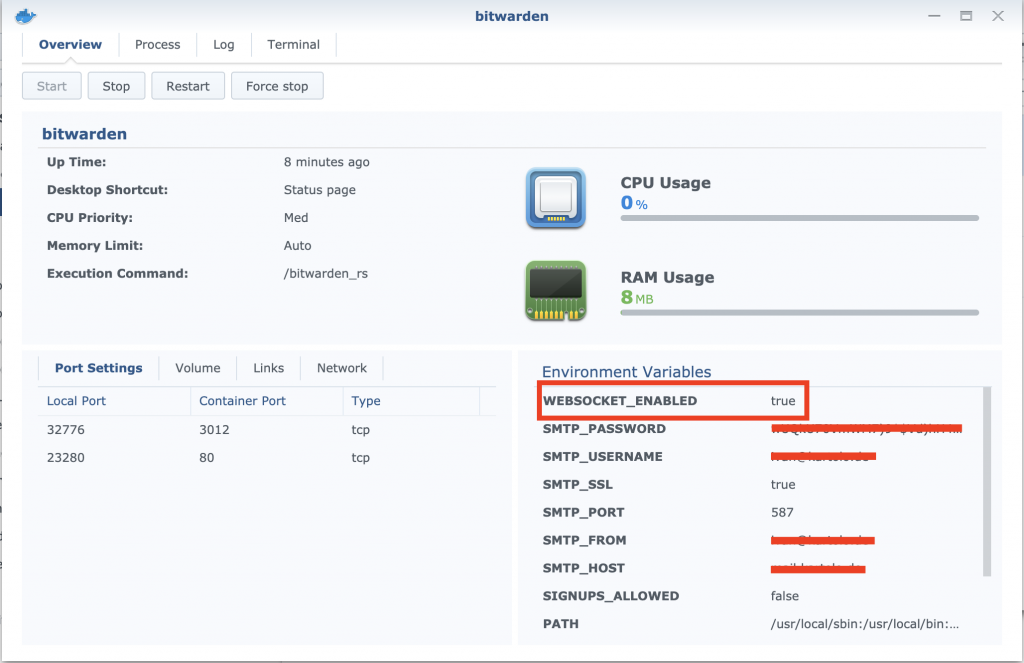
Activating WebSocket in Docker
First point is the easy one. Stop the docker container and add new environment parameter WEBSOCKET_ENABLED. Set this parameter to true.
Nginx reverse proxy
Now the hard part. Since in the DSM Application Portal only host based reverse proxy is configurable, we need to manually change the webserver config. Synology uses Nginx as webserver. To get to the nginx config, you should activate SSH on your DSM.
Once SSH is active, let’s connect per SSH to DSM. If you set the reverse proxy in Application Portal, you’ll find the nginx config in /etc/nginx/app.d/server.ReverseProxy.conf. Let’s make a copy of this config and rename it, e.g bitwarden.ReverseProxy.conf. I put it in the docker volume /volume1/docker/bitwardenrs/, since this folder is backed up.
There are 2 things in the config to be customized:
- path to the SSL certificate
If you create Let’S Encrypt certificate directly in DSM (Control Panel > Security > Certificate), so path to the certificate would be/usr/syno/etc/certificate/system/default/fullchain.pem.
Update: on DSM 7.0 the path to SSL certificate is:/usr/syno/etc/certificate/system/default/RSA-fullchain.pem
You can check it by using openssl tosudo openssl x509 -in /usr/syno/etc/certificate/system/default/RSA-fullchain.pem -text -noout
- location reverse proxy for the WebSockets
Add following location to the Nginx config. Please change the port accordingly.location /notifications/hub { proxy_pass http://localhost:32776; proxy_set_header Upgrade $http_upgrade; proxy_set_header Connection "upgrade"; } location /notifications/hub/negotiate { proxy_pass http://localhost:23280; }
My complete Nginx config is
server {
listen 443 ssl http2;
listen [::]:443 ssl http2;
server_name domain.tld;
ssl_certificate /usr/syno/etc/certificate/system/default/RSA-fullchain.pem;
ssl_certificate_key /usr/syno/etc/certificate/system/default/RSA-fullchain.pem;
add_header Strict-Transport-Security "max-age=15768000; includeSubdomains; preload" always;
location / {
proxy_connect_timeout 60;
proxy_read_timeout 60;
proxy_send_timeout 60;
proxy_intercept_errors off;
proxy_http_version 1.1;
proxy_set_header Host $http_host;
proxy_set_header X-Real-IP $remote_addr;
proxy_set_header X-Forwarded-For $proxy_add_x_forwarded_for;
proxy_set_header X-Forwarded-Proto $scheme;
proxy_pass http://localhost:23280;
}
location /notifications/hub {
     proxy_pass http://localhost:32776;
     proxy_set_header Upgrade $http_upgrade;
     proxy_set_header Connection "upgrade";
}
location /notifications/hub/negotiate {
     proxy_pass http://localhost:23280;
}
# Optionally add extra authentication besides the AUTH_TOKEN
# If you don't want this, leave this part out
location /admin {
# See: https://docs.nginx.com/nginx/admin-guide/security-controls/configuring-http-basic-authentication/
auth_basic "Private";
auth_basic_user_file /path/to/htpasswd_file;
proxy_set_header Host $host;
proxy_set_header X-Real-IP $remote_addr;
proxy_set_header X-Forwarded-For $proxy_add_x_forwarded_for;
proxy_set_header X-Forwarded-Proto $scheme;
proxy_pass http://localhost:23280;
}
error_page 403 404 500 502 503 504 @error_page;
location @error_page {
root /usr/syno/share/nginx;
rewrite (.*) /error.html break;
allow all;
}
}
Then create a link to this config in /etc/nginx/sites-enabled/
ln -s /volume1/docker/bitwardenrs/bitwarden.ReverseProxy.conf /etc/nginx/sites-enabled/
Before activating our own Nginx config, you have to remove the Reverse Proxy config in the Application portal. Then we can restart the Nginx:
sudo synoservicecfg --restart nginx
On DSM 7.0 the command to restart Nginx is:
sudo synosystemctl restart nginx
Port redirect in Router
Don’t forget to redirect port 3012 from your router to Synology.
That’s it. If you login to your Bitwarden and open the developer tools, you’ll see following output in the console.

Hi,
very appreciate you first tutorial, it was very helpful to get working bitwarden server on my DS218+.
Now i’d like to make live sync working. I found a couple of tutorials in init but no success so far.
I have tried to put a custom.conf file into /usr/local/etc/nginx/sites-enabled (its different to your location, but i’ve nothing there) and thereafter i even could’t reach my DS over port 5001 only 5000 and bitwarden server was unreachable as well.
Could you please help me.
1. Should i first delete Reserve Proxy set up in your first tutorial from Synology(setting/application portal/reserve proxy)?
2. do you mean “create a link to this config in” like:
ln -s /var/tmp/nginx/app.d/server.ReverseProxy.conf /usr/local/etc/nginx/sites-enabled
Thank you
the reverse proxy should be deleted, since this will be added manually by the link (ln -s).
Another way (easier?) is adding to proxy reverse config to a nginx docker.
There’s no need to port forward on the router. It should all be done over port 443.
Hi, is this setup really necessary?
When you open Application portal on Synology, then “reverse proxy” and editting reverse record for “Bitwardenrs” then in the options (General, Custom Header, Advanced Settings) you can change options “custom header” where when you click on “create” it offers you to directly Websocket and add parameters “upgrade = $http_upgrade” and “connection=$conection_upgrade”.
Isn’t it the same what you tried to put there by SSH?
Then I am not sure what else to setup there to get it in function.
Thank you for your opinion.
Also wondering if the port forwarding to 3012 is really needed, as the whole point of reverse proxy is that you don’t need to open individual ports to the various apps. One connection to 443 (and so just that port forwarded) ought to do it, unless I’m completely misunderstanding the intention of all this. Can you confirm? Thanks!
basically it depends on your network structure. If your Diskstation is a DMZ, you don’t need to set port forwarding in router, since your router sends everything to your DS.
Sorry for bothering you again. But nobody is willing to help…
I have allowed reverse proxy on my synology. I just want to allow feature livesync in the bitwarden. I am not so good in SSH usage, just a little. Do I understand right that I need to add these rows to the file “server.ReverseProxy.conf” on my synology under the reverse record for my bitwarden? I don’t want to mess anything.
location /notifications/hub {
proxy_pass http://localhost:32776;
proxy_set_header Upgrade $http_upgrade;
proxy_set_header Connection “upgrade”;
}
location /notifications/hub/negotiate {
proxy_pass http://localhost:23280;
}
My bitwarden ports are:
32776:3012
8123:80
rocket port: 80
Do I need to set variable “WEBSOCKET_ADDRESS” do my bitwarden too? Is so, what it should be? 127.0.0.1 or localhost?
Ok, when I edit this “server.ReverseProxy.conf”, am I going to simply copying it back to it’s location and rewrite the actual one, right?
Then to restart synology proxy reverse service?
What about websocket in the Synology Proxy reverse rules? Shall I add websocket under the custom header anyway? Or this recocrd will do the same?
Thank you a lot.
the reverse proxy in application portal must be removed, since the edited file is manually loaded in
/etc/nginx/sites-enabled/. The nginx config must be saved in your shared folder, or it could be remove on DSM upgrade.There’s no changes in Docker environment needed.
Excellent article. I think that some people are getting confused with how detailed you instructions are, but at the same time you miss explaining how to link files. Or the need to delete the create reverse proxy file that Synology creates.
Also, this is very useful and well written, but maybe it will be good to mention to people that Synology has an automatic way to allow websockets. When you create a reverse proxy using Synology’s menu, you just need to go to “Custom Header” and select “Websockets” in the “create” menu. Maybe that will save some time and headaches to some people coming to your site finding how to do this in Synology.
Again, Thank you for the tutorials. I have followed your other tutorials and they have been of great use.
thank you for the feedback. I just add how to make a link ;)
If some readers experience problems: remember to change the path to your certs, if you have can´t use the standard cert.
you will find all the certs of your diskstation in /usr/syno/etc/certificate/_archive
German:
Hallo
Ich habe Live Sync mit der Datenbank getestet.
Es funktioniert!
Öffnen Sie Coloud Sync, than edit your task und gehen sie zum Dateifilter.
Ganz unten kann man “backup.sqlite3” order “.db.sqlite” hinzufügen.
Dann auf “OK” drücken und es funktioniert!
English:
Hello,
I tested Live Sync with the database.
It works!
Open Coloud Sync, than edit your task and go to the file filter.
At the bottom you can add “backup.sqlite3” or “.db.sqlite”.
Then press “OK” and it works!
As of DSM 7 this does not work anymore. The path to the Certificate (/usr/syno/etc/certificate/system/default/fullchain.pem) has changed and prevents NGINX from starting properly. Have you worked around this already? Would it be possible to just use the location part of this tutorial?
just upgraded my DS to DSM 7 couple days ago. Bitwarden container and Nginx (re)-starts ok.
Path of fullchain.pem file is also correct.Sorry, my bad. After manually renew the certificate, DSM shows some web server error messages. I’ll take a look and update the post accordingly
Path to the SSL certificate is “/usr/syno/etc/certificate/system/default/RSA-fullchain.pem”.
Command to restart nginx is also change. The command is “sudo synosystemctl restart nginx”.
The article is updated. Thanks for pointing this out.
Sadly this did not solve the problem for me. As soon as I change both Certificates to “RSA-fullchain.pem” and restart, DSM starts complaining about non working apps. After rolling back the changes (i.e. commenting out the certificates), those packages need repairing but work afterwards…
Any ideas?
Hi,
I was able to configured vaultwarden according to your article on DSM 6 and was using it until now without any issues. Since DSM 7, nginx overwrites the path of “server.ReverseProxy.conf” from bitwarden folder to default “/usr/local/etc/nginx/sites-available/XXX.w3conf as soon as I restart with “sudo synosystemctl restart nginx”. Any idea how to workaround?
I updated the howto. I don’t use server.ReverseProxy.conf as filename, but bitwarden.ReverseProxy.conf. so it won’t be overwritten.
in /etc/nginx/sites-enabled I have following link:
* bitwarden.ReverseProxy.conf -> /volume2/docker/bitwardenrs/bitwarden.ReverseProxy.conf
* server.ReverseProxy.conf -> /usr/local/etc/nginx/sites-available/fba6b648-0a7f-4b03-be63-16e8575e2b77.w3conf
I noticed that in your example .config file from above you have linked both “ssl_certificate” and “ssl_certificate_key” to the same “RSA-fullchain.pem”. Is this correct?
yes, that’s what I found, if the certificate is created by DSM
it seems that the latest DSM 7.0-41890 has changed some stuff in reverse proxy config. Do you think it’s safe to just use your format from above to replace this:
server {
listen 443 ssl;
listen [::]:443 ssl;
server_name your_domain.com ;
if ( $host !~ “(^your_domain.com$)” ) { return 404; }
include /usr/syno/etc/www/certificate/ReverseProxy_79958b9e-34ff-4692-9caf-88ae75b2cce6/cert.conf*;
include /usr/syno/etc/security-profile/tls-profile/config/ReverseProxy_79958b9e-34ff-4692-9caf-88ae75b2cce6.conf*;
add_header Strict-Transport-Security “max-age=15768000; includeSubdomains; preload” always;
proxy_ssl_protocols TLSv1 TLSv1.1 TLSv1.2 TLSv1.3;
location / {
proxy_connect_timeout 60;
proxy_read_timeout 60;
proxy_send_timeout 60;
proxy_intercept_errors off;
proxy_http_version 1.1;
proxy_set_header Upgrade $http_upgrade;
proxy_set_header Connection $connection_upgrade;
proxy_set_header Host $http_host;
proxy_set_header X-Real-IP $remote_addr;
proxy_set_header X-Forwarded-For $proxy_add_x_forwarded_for;
proxy_set_header X-Forwarded-Proto $scheme;
proxy_pass http://localhost:8922;
}
error_page 403 404 500 502 503 504 /dsm_error_page;
location /dsm_error_page {
internal;
root /usr/syno/share/nginx;
rewrite (.*) /error.html break;
allow all;
}
}